Tuesday 25 February 2014

Second piece of the gate

After I finished the stairs I didn´t know what to do next. Idleness results in time loss so I put that piecer aside and started working with the second piece. The floor had been finished earlier so I started to construct the platforms.


This piece is little different that the other because there is a doorway on to the firing platform. There will be no door, just metal stairs that lead up on to the opening.


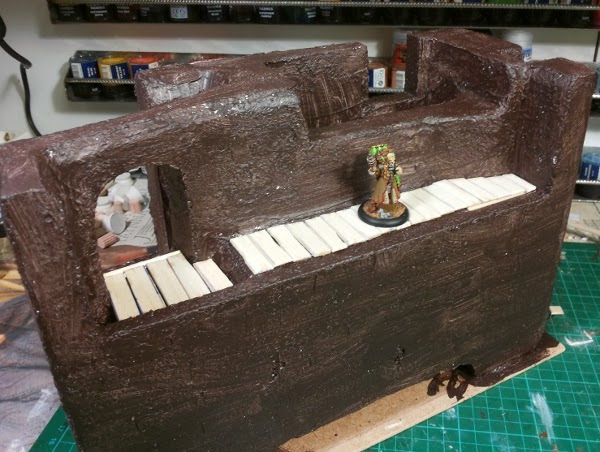
I will build some protection for the archers in front of the platform and Dr. Arkadius came to check that I left enought room for that.


Last thing for the night were the planks for the cannon.


Now I have to figure out what kind of stairs lead up to the cannon..

Monday 24 February 2014

Stairs in Rob Hawkins style

I had planned some stairs on gate and fortunately Rob Hawkins released nice article about building one. Go check it out! I have to say that Rob is one hell of a hobbyist and I wish that some day I could be even close to that level on terrain mastery.

First I constructed a platform where the stairs would begin. For the poles I used real hard wood so that it would endure better.


If you read Rob´s article the next photos doesn´t need any explanation.


First I tried to cut those left overs with knife but good old cutters worked even better.


Then, unlike Rob, I glued the side beams straight on to the gate and started to slap the steps on. Brilliant and fast!


Dr. Arkadius checked that mini with a normal base stays easily on the steps.


Mini with larger base fits in also but because only mini at hand at the moment with bigger base were Kromac with his scenic base, I couldn´t try it proberly.


I´m truly making some progress!

Friday 21 February 2014

Woodwork..

Well, now that the base for the project has been constructed it´s time to make the project really look like a town gate. There will be platforms for archer and also for cannons (!) so it was time to grap some balsa. Because the motto is "faster, higher, better" I opted to use superglue instead of PVA to minimize the drying time. Although the vapors sometimes burns your eyes, this was an exellent choise because I made a Huge progress in no time.

I used wire brush to make some grains to the balsa and then cut same width blanks what I used with the harbor docks. Then I started to lay those down with superglue without unnecessary planning.


Ofcourse my early work was inspected by Dr. Arkadius and the scale looked alright.


For the first archer platform I build simple supports on which I glued some balsa. Because I used balsa for the supports also, I used some metal rods to pin the support to the wall.


As I said earlier there will be a cannon on the upper level so it was next in line.


Dr. Arkadius aproves and so do I. The use of superglue speeded up this project alot and I will continue to use it with this project. All of the above took under hour to complete! Althoug I used only balsa and superglue, the structure is also quite sturdy!

Next up: Some stairs..

Tuesday 18 February 2014

Onwards!!!

Well, the initial plan to cover the styrofoam didn´t work but that didn´t hold me back. I grapped some wallfiller and started splash it around.


I have to say that thank god that I used the paint/sand mixture because it hardened the surface and helped to spred the filler. Also the sand still comes thrue and gives some drybrushing opportunities. I decided to amplify the effect by dapping the filler, while it was still wet, with Greek seasponge (yes, you have to have Greek one because it will not be the same effect with lets say Norwegian sponge).


The effect is subtle but it´s there. And I aplyed it to all the pieces.


Here are all the pieces together. I like it!


Then I used the same brown paint without the sand to cover the filler and give basecoat to the pieces. I always use brown as a base because I think that it´s more natural than straight black. 


Hah, I´m moving like a train with this project!! Next up some woodworks...


Monday 17 February 2014

Back on track with the Gate

Surprisingly I have had quite a lot of time to work with the gate. Why I haven´t posted more pics then you may ask? Because I have spend all the extra time with the gate to get things moving! Because I tend to plan more than build, I decided to cut down the planning with this project and try to work as streamlined as possible. Let´s see how i manage to do that!

Now it´s time to post some of the progres shots and future updates are coming soon, I hope =).

Because the styrofoam is fragile, I had to base the parts and used some MDF to do this. Because I have planned to add some thematic details alongside the gate pieces, I cut the bases a bit bigger in some places.


Then I used PVA glue to attach the bases and placed some weights on top to prevent warping. After the glue dried I still reinforced the structure with long screws.


There will be firing platforms on top of the gates so I cut few doorways without much planning. Because the town has been a rich harbour city years ago I visioned that some may have attacked against it so I cut small hole to the wall (with cracks) where a rock of a trebuche has been struck.


Because this project is all about speedbuilding and fun, I mixed some houshold paint with sand in the hope to cover the styrofoam and it´s surface texture and also give some base to drybrush.


Well the plan didn´t work because the stryrofoam texture still shines through.


Well, this is  a problem that I will tackle in the next post.

I´m so PSYCHED about this project!!!