Wednesday 13 February 2013

First painted Zombicide figures!

Today I managed to paint about an hour and finished the first five zombies. Well, not completely because I will add later some blood splatters but almost. Nothing fancy with the painting but I think that these will do on the gameboard. Thinking also that should I add something easy and quick to the bases? Hmm..


Have to say that I´m really impressed with the amount of details on these figures. Although the plastic is little soft (not too much) these are really good miniatures. I have much simpler figures in my collection which doesnt have even half of the details what these have. It´s also too easy to dwell in to the painting of these details and loose alot of time.

Tuesday 12 February 2013

Something else..

Tonight I decided to put the terrain projects aside and do something completely else, painting! It has been a while since I cracked open some paint pots so it was a time to but the new Raphael´s to test. So I cleaned (!?) my workbench and set up my painting studio.


The plan was to paint some Zombizide figures because Guillotine Games announced season two for Zombizide so I have to get the old ones in colors before this must-buy-product!

I used Army Painters leather brown for basecoating. I like to paint on a brown base because a) the shadows are IMO more natural than straight black ones and b) it´s easier to spot all the details compared to white or black basecoat.


Of course because I haven´t painted for ages the first pot I opened splashed on to the table. What a great start. It was also my last pot of Devlan Mud so I have to soon start looking for replacement product. I have heard that GW´s current brown wash isn´t even near the old one. That´s ok because I have been stearing my choises to another companys products anyhow.


The plan was to take five miniatures and use mainly the same colors on them to speed up the process. After an hour I was at this point.


There is 71 figures in Zombicide so at this pace (the figures aren´t even ready) it will take something like 14 hours to paint all of them! Darn, have to speed up the process alot!!
One reason for this slow pace are the Raphael brushes. Holy Cow how good these brushed are!! I have known what snap means but now I really KNOW what good snap means! I so wish that I would have been wiser sooner and bought these instruments along ago. Well, live and learn. It is really a pleasure to paint with these.

To speed up the painting I will use the following plan on the future figures:

  • Over the basecoat I paint the main colors (duh!!)
  • Overal shading wash for the whole figure
  • highlight with the same main color or one step brighter to give some variation
  • maybe some blood splatter and then move on to next batch!

Of course the survivals will get extra attention but I don´t paint them yet.

Sunday 10 February 2013

In the Zone!

Some times when you do something you just hit the zone and let the feeling guide you. Today was my day. The flu passed and when I started to work on the well I was hit by a crystal clear vision of the finished product. Well, not the actual finished version, just the thought and certainty of something very nice looking. Hard to explain, let the pictures talk.

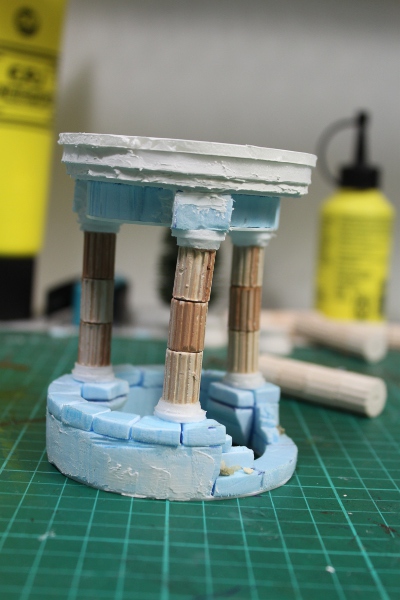
 I glued some foam on top of the pilars to create a hat for the well.


Then I cut four different sized circles from foamboard, glued those together and on top of the hat.


I used some wall spackle to cover some holes and protect the edges of the board and foam.


Then I used poor man´s etched brass, peelable stickers, to give the hat some texture.


I also glued some Hirts Arts bits to the side of the well.


Because this is a well I wanted something more to really make it to look like one. I have made some detailed work before but this time I really managed to make something quite good looking.

I started by cutting some circles from plasticard and drilled some holes in those.


 Then I cut little bit bigger circles and cut those in half.


Little bit drawing, some holes and more cutting.


Then I glued those on each side of the smaller circle and glued the whole thing to the under side of the well´s hat, a winch!!


 Winch needs a rope so I made a anchor for the rope from brass wire which was glued on a small plastic strip. Then I took some self made rope and twisted it around the anchor.


Another Hirts Arts object and some thin wire to make a bucket. I also made a hook from short piece of rope and some thin metal wire.


Then it was just a matter of assembly.


Although I didn´t plan this at all but just followed my guts, I felt that it still needed something to fullfill my initial vision. So I took a button and some cartboard.


I used the edge of tape to make some arched decoratives.


Again, some assembly.


Holy sh*t, I LIKE!!!!

Tuesday 5 February 2013

Door for the sewers/crypt..

I wrote on some forums that there is a sewer complex under the city. One entry to the sewers is from the harbor through the sewer conduit.


Because the citizens don´t burry those who has past away but give them to the sea they need some place to keep the dead before the ritual. For this purpose there is a crypt in the sewers and one hex represent the entry to the crypt.


Because I always have multiple projects under construction at the same time (which is NOT a good thing time-wise) I had moved this entry to the side for some time. Now it was time to construct a door for it. Base was made from 5mm foamboard and thin plastic strips was used to mimic metal plating.


 I made the hinges from two different sized plastic tube.

The handle is a metal ring bought from a hobbyshop and I also added small metal plate to the door.


I planned to make some symbols on the metal plate but decided to use this metal ornament which I bought from closing-down sale of one craftshop for really, really good price. I will use these also to decorate the hex.

 Here is the door glued in it´s place. The torches are made from plastic tube, cake decorations and some Hirt Arts casting.


After some thought I realized that those flames are so big and close to the door that it would be quite interesting to try to open it. Well, not going to do anything about it!

Monday 4 February 2013

Mind tweeking and start of a new hex!

Weekend was so full of surprises that it took some time to adjust the brainds on terrain frequenzy today. Any how I think that that adjustment was pretty succesful because I figured out a new hex!

From the start I have pondered how I will fit the houses on to the board if it´s too full of stuff. I could leave the hexes quite empty but then the whole idea of hexes would be lost (Ofcourse there will be empty hexes but not too much). So now I came up one solution for this.

That platform is glued on top of the hex. It gives enought space for the house and makes it more impressive by lifting it above the ground. Because of the shape of the hex, you can turn that hex around until you find the right configuration where everything fits in.


Because the platform goes over the edge of the hex it also covers the joints nicely and breaks the "hexview".
There will be wide stairs leading on top off the platform and also somekind of railing around the edges.


I will streghten the parts which go over the edges to prevent breaking. I´m planning also to cover the sides with somekind of tiling which would also give some protection for the foam.


Let´s see how this works out!

Friday 1 February 2013

BOOOMBOOMBOOMBLASTER!

Even though I´m sick as a dog I had to rush to my hobbyhut when my mother-in-law came for a visit. No, I wasn´t running away because she often brings good food but no she brought something more brilliant. My wifes old stereo!!! Have I eaten so much wrong kind of pills that I´m freaking out for some out dated tech? Again, no.

At to this precise moment I have always listened some radiostation when working. Some times it ok but most of the time the music or speech just doesn´t create right kind of athmosphere. Now I can play what ever I want when ever I want and as loud as I want. Great!!

 You may think that I´m a stingy bastard because I haven´t gone to some shop and bought a new stereo (well, I might just be) but at to this moment there just haven´t been enough loose cash (kids you now) or the right feeling to do so. That´s why I´m more than happy to recieve this marvelous machinery.

Forget your IPads, Note2´s, Anthem´s or Technics because this thing rocks!! It plays CD´s (3-CD changer, just wow), has a radio and what´s important, plays tapes. CASETTES!?!?!? HAha, have to go to some flea market to bick up tapes, the older the better. It would be so cool to find some old-school rap!!

On top of this all, it´s also very polite thing because it salutes you when you turn on the power.


In this marvelous happines created by technology and drugs I can add few very groggy pics to the end of this post. These represent my new terrain experiment which could solve some problems or create some more, I don´t know. But if you know or ques what´s going on, please enlighten me!! =)


Some progress with the well

Like I mentioned in the last post I was little worried about how the well would persist all the handling because I didn´t pin it to the platic place. This in mind I decided to make the upper part of the well little bit sturdier than I had planned.

Firstly I made end caps for the pilars. Here I noticed that the columns from PK-Pro are not unified in lenght. The error isn´t big but I had to make little adjustment with plastic pieces so that the top half would be level.


Then I used the round foam piece, from the very first cut when starting the hex, to draw outlines for the plastic support piece.
I have noticed that when cutting complex shapes and working with them it´s not clever to immediately throw away the left overs because you can maybe use them later on. This has been the case many times with this table project


Like you see from the upper picture the idea is to mount the pilars to the plastic. Over this plastic sheet I glued and pinned a round piece of foam which will be the base for all the decoration.


After some dryfitting I drilled the support pins in place, placed the tophalf on with glue and cut the pins in right lenght. Some extra weight was needed to get the joint tight.


Soon I have again enough material to write a article on HCO...